Showing posts with label Learn. Show all posts

Wednesday, November 11, 2020

Secure your Account and Unlock 20% Off

Adafruit is currently offering a one-time use discount code of 20% off

Some restrictions apply, including product-level restrictions (a handful of products, including most Raspberry Pi boards, will not be eligible for discount). The discount does not apply to subscriptions or gift certificates either. The code is active from now until Thanksgiving (11/26/2020) -- so get shopping!

This guide will show you how to secure your Adafruit account and, once secured, how to apply the discount to your order.

BrainCraft Camera Case

3D Printed Case

If you're just getting started with BrainCraft projects, chances are you need a way of keeping parts held together. This is where a 3D printed enclosure comes in handy. This case is designed to house the Raspberry Pi 4, BrainCraft HAT and a Pi camera module. It features a mounting plate for mounting to camera tripods.

Tuesday, November 10, 2020

Adafruit MagTag

adafruit_products_MagTag_top_angle.jpg

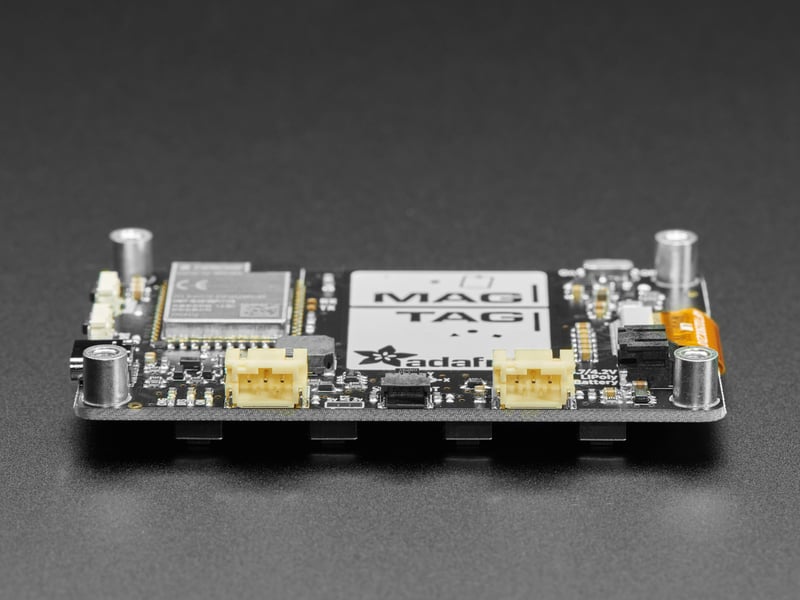
The Adafruit MagTag combines the new ESP32-S2 wireless module and a 2.9" grayscale E-Ink display to make a low-power IoT display that can show data on its screen even when power is removed! The ESP32-S2 is great because it builds on the years of code and support for the ESP32 and also adds native USB support so you can use this board with Arduino or CircuitPython!

adafruit_products_MagTag_back_angle.jpg

We designed this board to be low-power friendly - with a spot for a 350 or 420 mAh battery and built in battery charging over USB C. During deep sleep, with the NeoPixels and speaker amplifier disabled, we measured 250uA power draw so you can run for a few weeks between charges.

adafruit_products_MagTag_back.jpg
adafruit_products_MagTag_bottom_edge.jpg

Here's the cool hardware we put together:

  • ESP32-S2 240MHz Tensilica processor - the next generation of ESP32, now with native USB so it can act like a keyboard/mouse, MIDI device, disk drive, etc!
  • WROVER module has FCC/CE certification and comes with 4 MByte of Flash and 2 MByte of PSRAM - you can have huge data buffers
  • 2.9" grayscale display with 296x128 pixels. Each pixel can be white, light gray, dark gray or black. Compared to 'tri-color' displays with a red pigment, this display takes a lot less time to update, only about a second instead of 15 seconds!
  • USB C power and data connector
  • Four RGB side-emitting NeoPixels so you can light up the display with any color or pattern
  • Four buttons can be used to wake up the ESP32 from deep-sleep, or select different modes
  • Triple-axis accelerometer (LIS3DH) can be used to detect orientation of the display
  • Speaker/Buzzer with mini class D amplifier on DAC output A0 can play tones or lo-fi audio clips.
  • Front facing light sensor
  • STEMMA QT port for attaching all sorts of I2C devices
  • Two STEMMA 3 pin JST connectors for attaching NeoPixels, speakers, servos or relays.
  • On/Off switch
  • Boot and Reset buttons for re-programming
adafruit_products_MagTag_side.jpg

Friday, November 6, 2020

Air Quality Sensor 3D Printed Enclosure

IOT Air Sensor Monitor

Build a 3D printed enclosure for your IOT Air Quality Sensor. This project is similar to our other air quality sensor guide, except it uses Adafruit STEMMA sensors and has minimal soldering required.

This project uses sensors to measure PM2.5 (particles that are 2.5 microns or smaller in diameter) dust concentrations, temperature and humidity

This weatherproof enclosure is modeled after a silo-home. We've included different types of mounting holes and brackets for different mounting configurations.

Wednesday, November 4, 2020

Adafruit Metro ESP32-S2

What's Metro shaped and has an ESP32-S2 WiFi module? What has a STEMMA QT connector for I2C devices, and a Lipoly charger circuit? What's finishing up testing and nearly ready for fabrication? That's right - its the new Adafruit Metro ESP32-S2!

With native USB and a load of PSRAM this board is perfect for use with CircuitPython or Arduino, to add low-cost WiFi while keeping shield-compatibility.

Wednesday, October 28, 2020

Adafruit Voice Bonnet

Your Raspberry Pi computer is like an electronic brain - and with the Adafruit Voice Bonnet you can give it a mouth and ears as well! Featuring two microphones and two 1 Watt speaker outputs using a high quality I2S codec, this Pi add-on will work with any Raspberry Pi with a 2x20 connector - from the Pi Zero up to the Pi 4 and beyond (basically all but the very first ones made).

We specifically designed this bonnet for use with making machine learning projects such as DIY voice assistants - for example see this guide on creating a DIY Google Assistant. But you could do various voice activated or voice recognition projects. With two microphones, basic voice position can be detected as well.

With the extra space on the PCB we also added some bonus extras!

HalloWing Flapping Bat

Twinkle, twinkle, little bat! How I wonder what you're at!
Up above the world you fly, Like a teatray in the sky.

The Mad Hatter  
Alice in Wonderland by Lewis Carrol

Make a spooky bat out of chipboard and decorate it with your best Halloween colors, sparkles, and ribbons. A little hot glue and crafting, and you're ready to hang it above your door, where unwary passers-by will brush past and trigger your bats wings to flap up and down, scaring them out of their pants!

You don't need a fancy motion sensor to trigger this halloween effect. The bat wings are triggered by a strand of conductive thread tied to the Hallowing's onboard capacitive touch sensor. Anyone who comes in contact with the secret dangling thread will cause the bat to leap into motion.

The Hallowing board is the spookiest, creepiest, scariest microcontroller around. Its skull face and winking OLED eye are sure to frighten even the bravest of makers when you program it to go Bump in the Night.

Difficulty Level

This is a very easy beginner project. There is no soldering required - all the parts just plug in or tie onto one another. 

The bat shape is made from light chipboard, and can be cut out with a Cricut or Silhouette cutting machine or with scissors or a utility knife and a little patience. Final assembly makes use of a hot glue gun.

The software for this project is also very easy to install - just drag and drop the file onto the Hallowing and you're ready to go.

Additional Materials Needed

  • 12'x24" sheet of light chipboard - I'm using store bought, but you can also use a cereal box that's been sliced at the corner and unfolded so it's flat
  • About 18" of thin, stiff wire - I'm using 22g steel wire 
  • Hot glue gun
  • Glitter, paint, and sparkles for decorating
  • Fishing line or string for hanging your bat
  • Utility knife or vinyl cutting machine
  • Small Rubber bands
  • A small screwdriver to assemble the servo

If you're using a Cricut or Silhouette to cut your bat shape, you'll need a 12x24 firm grip cutting mat and some blue painter's tape.

Matrix Portal New Guide Scroller

Is there a new guide on the Adafruit Learning System? Glance over at this attention-grabbing Matrix Portal New Guide scroller. Every hour, this project fetches the latest guides from the Adafruit Learning System and displays them on the Matrix Portal.

You'll use CircuitPython and the Adafruit Matrix Portal to fetch JSON data from the Adafruit Learning System's public API, parse the data, and display it scrolling across a RGB Matrix. 

This internet-connected project can easily be adapted to a REST API of your choice to scroll data of your choice: negative COVID-19 tests, sports scores, positive news headlines, or stock prices. 

If you'd like your LEDs diffused (and if your LED matrix is 4mm pitch or smaller), some acrylic may help:

Adafruit carries a number of 64x32 RGB LED Matrices, varying between the space between LEDs (pitch) and whether rigid or flexible. Choose your favorite - larger pitch means the display is larger, width and height-wise but with the same number of pixels, and larger may be easier to read further away. Smaller for near your desk, for example.

Tuesday, October 27, 2020

3D Printed Frankenstein Monster with NeoPixel Eyes

3D print this Frankenstein's Monster head, nicknamed Frank, to build a light-up Halloween decoration. NeoPixels illuminate the inside of the model for a clean and even lighting effect. Frank's brains are powered by a QT Py board, making this build nice and compact.

Halloween Costume Face Mask

Halloween is such a fun holiday, and traditionally includes mask-wearing to complete your costume. This year, face masks have been a daily fashion choice for many of us, so here's a guide that focuses on making that face mask a little extra special for the spookiest day of the year.

Use colored felt to add a bird beak or monkey face to any face mask. Or create a "plague-doctor" style mask from scratch to bring a bit of historical authenticity to your costume this year.

We've included printable patterns and sewing directions. You'll need fabric and interfacing or craft felt, scissors, pins, and a sewing machine (or a needle and thread and some patience).

Monday, October 26, 2020

Remote Control Candy Dispenser Ghost

This is a 3d printed claw gripper that we designed to hold a small bag of candy.

We think this is a fun way to give out candy that could be adapted for all sorts of projects.

The BLE libraries for Circuit Python makes it easy to control servos using the Bluefruit app.

In the code, the up and down buttons are set up to trigger the servo when they’re pressed.

The angle of the servo is tuned for the gripper so it doesn’t stress out the motor.

In the Bluefruit app you can press the up and down buttons to open and close the gripper.

We think this is a quick and easy way to make a BLE controlled servo project.

Make a Pi Trash Classifier with Machine Learning and Lobe

The Trash Classifier project, affectionately known as "Where does it go?!", is designed to make throwing things away faster and more reliable.

This project uses a Machine Learning (ML) model trained in Lobe, a beginner-friendly (no code!) ML model builder, to identify whether an object goes in the garbage, recycling, compost, or hazardous waste. The ML model is loaded onto a Raspberry Pi computer to make it usable wherever you might find rubbish bins!

This tutorial walks you how to create your own Trash Classifier project on a Raspberry Pi from a Lobe TensorFlow Lite model in Python3.

Difficulty: Beginner++ (some knowledge w/ circuits and coding is helpful)

Read Time: 10 min

Build Time: 60 - 90 min

Saturday, October 24, 2020

Animated GIF Player for Matrix Portal

There’s something eye-catching about LED matrix graphics that you don’t get with a normal LCD display. Maybe it’s the brightness or the ultra-saturated colors. Perhaps that’s why they’re increasingly popular in advertising signage.

This guide uses an Adafruit MatrixPortal M4 and RGB LED matrix to create an animated GIF player that’s drag-and-drop easy, like a pixelated version of a digital photo frame. Use it to make a holiday window display or to advertise your favorite shawarma cart.

This is a different approach than used in our Sprite Sheet Animation and Tombstone guides. There, the animation is controlled by CircuitPython code…letting you control speed or interactivity or anything else you can dream up. But when you’d like something simpler, animated GIFs are easy and ubiquitous…you can likely find some ready-made with a few internet searches. Toss a bunch on the Matrix Portal flash drive and it plays them back in a loop.

Thursday, October 22, 2020

Adafruit QT Py Activity Timer and Hydration Reminder

It's easy to get focused on a task, and forget to take a break, or even eat lunch. Perhaps you find that you aren't drinking enough water throughout the day. Sometimes you simply need some assistance remembering things! This project is here to help.

This guide will show you how to build a customisable LED timer using the Adafruit QT Py, the LIS3DH accelerometer, and two NeoPixel LED rings. It's meant to be compact and sit on your desk. The rings light up to let you know the timer is running. Set it on its side to turn off the timers and the LEDs.

For the activity timer, you'll set a duration for two different activities, such as 120 minutes of work and a 15 minute break. Plug it in, start the timer and it will gently fade between two colors to let you know time is passing. When it reaches the end it stays at that color for a bit before blinking at you to remind you that you haven't moved to the next task. Flip it over to begin the second timer, and the process repeats.

For the hydration reminder, you set the interval you'd like to be reminded to drink water, such as once every 60 minutes. Plug it in, start the timer, and the process is the same as the activity timer. In this case, when you flip it over, it counts down the same amount of time.

Parts

This build uses the 50mm long STEMMA QT cable listed below. The 100mm long STEMMA QT cable would also work, but would require taming the extra cable length.

Wednesday, October 21, 2020

Matrix Portal RGB Display Handbag

Make a display for your display! Show off your message to the world. This guide will show how to set up and assemble a Matrix Portal and RGB Matrix display, then make a transparent pocket in your backpack, purse, or messenger bag to show it off.

There is also a simple code example that displays your bmp images in slideshow fashion. Use the onboard buttons to switch between folders and play different messages, or pause on your favorite image. Set your bag down and the onboard accelerometer will sense that you're not moving and dim the screen to save battery life.

You can also use any of the other Matrix Portal code samples to get you started. Get ready to have fun with all the features the Matrix Portal offers.

Difficulty

The build for this project is really easy. For the electronics setup you'll just need a screwdriver. For the handbag mod, we'll use fabric scissors and glue to affix our vinyl window. Sewing skills could be helpful, but are not required.

The coding portion is a little trickier, but I've made it as simple as possible to get images flashing up on your screen. There are more and more guides in the Adafruit Learning System every day with sample code, so this project can get as involved as you'd like.

Parts Needed

The Matrix Portal board is a very cool microcontroller that plugs into the back of any of our RGB Matrix display panels. The displays come in lots of different sizes - check them out here.

I used the 4mm pitch 64x32 sized one for this project. It measures 10' x 5', and it fits perfectly inside the outer pocket of my pack. 

This lipstick-sized USB battery will power the Matrix Portal for a few hours (depending on the brightness of your images). We've also got a bigger one if you want it to last all night.

This board connects with a USB C cable, so get at least one of these.

You can unplug the cable to turn it off, but it's easier and handier to plug in an on/off switch.

Additional Materials

You'll also need a backpack, messenger bag, or purse with a pocket that will comfortably fit your RGB display, with a couple inches extra on the "long" side to accommodate the Matrix Portal board and the USB cable.

I found the pack I'm using in this guide in the travel section at Target.

For the window, you'll need a square of vinyl. You can find this online or at your local plastic store. I used iridescent vinyl, which does make the matrix a little harder to see in the daytime, but it's shiny and iridescent so I don't really care -- and the matrix still shows through beautifully in lower light. The iridescence also gives my images a bit of a rainbow sheen, which I count as a win.

I also used a bit of Fray Check on my bag. This is a great product that you can find at sewing stores or online. Just apply it to the cut edges of your fabric and it will keep the fabric from unraveling. I always have some of this stuff handy.

Matrix Portal Scoreboard

Are your backyard games of cornhole or horseshoes getting pretty serious? It may be time to build a professional-looking scoreboard!

Use the Matrix Portal and LED matrix display along with Adafruit IO to score a friendly competition between two players or teams! You can use your smart phone's web browser to adjust the scores in real-time. All coded in CircuitPython.

Creating MatrixPortal Projects with CircuitPython

So you may have heard of the Adafruit MatrixPortal M4 and you want to get started with building a project using CircuitPython. The MatrixPortal library makes it really easy to get started with creating a new project, using this board, but it also supports a variety of other hardware to make creating project for an RGB Matrix very easy.

This library is built on top of the rgbmatrix and framebufferio modules which are included as part of CircuitPython on many of our boards. It also makes use of the ESP32SPI library, along with some lower-level dependencies, to communicate with server over the internet.

One of the big benefits of using this library is that it handles a lot of detection and initialization of RGB Matrices and drivers. For instance, if you had a Metro M4 Airlift Lite and an RGB Matrix Shield, you could still get the full benefit of the library. If you had a Feather M4 Express with an RGB Matrix FeatherWing for M0/M4 feathers, you could still get the benefit of RGB Matrix automatically initializing. It also supports the RGB Matrix FeatherWing for nRF52840 feathers when used in conjunction with an nRF52840 feather.

This library also supports a variety of different RGB Matrix Panel sizes. The number of address line pins used are based on the height of the display. It was originally written for the 64x32 matrix, but has also been tested on the 64x64 matrix, 16x32 matrix and 32x32 matrix as well.

For this guide we're going to cover using a MatrixPortal M4 along with a 64x32 matrix as those are both very popular options and are feature complete. If your hardware setup varies, you may need to make some adjustments.

Monday, October 19, 2020

Image Correction for RGB LED Matrices

Working with RGB LED matrices in CircuitPython (or Arduino with the Adafruit_Protomatter library), you might notice that certain graphics appear washed out. High-contrast elements such as text or “LED sand” look fine, but something appears off when you try loading a more subtly-shaded BMP image.

We’d like to have gamma correction baked right into our LED matrix driver code. Work continues on that but isn’t ready yet…and once there, it will demand extra RAM and CPU cycles that not all projects can afford.

In the interim, we’ve come up with a couple techniques for preprocessing images to look better on these matrices, as seen in the graphically-intensive Moon Clock and Matrix Portal Eyes projects. Not as desirable as true gamma correction in the matrix driver, but often a good compromise!

Both approaches require using a “regular” desktop or laptop computer — one uses a Python script, the other relies on the free ImageMagick graphics utility.

Wednesday, October 7, 2020

LED Matrix Display for Bitmap Pixel Art

Build your own pixel art display in order to view some of your favorite retro, low-rez artwork! We'll use .bmp format raster graphics files formatted for the 64x32 pixel RGB LED matrix display.

You can create your own pixel art, or scour the web for some favorites.

This project uses the Matrix Portal to show the pixel art on the display. It runs CircuitPython and uses the Slideshow library to make it easy!

You can play the slideshow and let it loop, or press the Matrix Portal's UP and DOWN buttons to pause/resume the loop and pick a particular image you're dying to see!

Tuesday, October 6, 2020

QT Py Lego

The QT Py is perfect for embedding into small spaces, like Lego buildings!

We used small PicoBlade 3 pin cables to wire our even smaller Ultra skinny Neopixel strips. These strip have a 4mm width, yet surprisingly flexible and can fit just about anywhere!

The strip is made of flexible PCB material, with some tape on the back making it easy to adhere to most surfaces.