Wednesday, August 31, 2022

Sandpaper 150mm disks organizer & storage #3DThursday #3DPrinting

lobrico shares:

Contains up to 10 differents 150mm sandpaper disks.

Each compartment can slide so that you can easily grab the content.

A big nozzle like 0.8 is clearly a good idea for smaller print time. No need for support.

download the files on: https://www.thingiverse.com/thing:5402162


649-1
Every Thursday is #3dthursday here at Adafruit! The DIY 3D printing community has passion and dedication for making solid objects from digital models. Recently, we have noticed electronics projects integrated with 3D printed enclosures, brackets, and sculptures, so each Thursday we celebrate and highlight these bold pioneers!

Have you considered building a 3D project around an Arduino or other microcontroller? How about printing a bracket to mount your Raspberry Pi to the back of your HD monitor? And don’t forget the countless LED projects that are possible when you are modeling your projects in 3D!

LIVE CHAT IS HERE! http://adafru.it/discord

Adafruit on Instagram: https://www.instagram.com/adafruit

Shop for parts to build your own DIY projects http://adafru.it/3dprinting

3D Printing Projects Playlist:

3D Hangout Show Playlist:

Layer by Layer CAD Tutorials Playlist:

Timelapse Tuesday Playlist:

Connect with Noe and Pedro on Social Media:

Noe’s Twitter / Instagram: http://instagram.com/ecken

Pedro’s Twitter / Instagram: http://instagram.com/videopixil

Punch loop needle and jig #3DThursday #3DPrinting

BBQSNAKE shares:

The jig has 2 holes for the brass tube. One is for drilling the hole near the tip. The other is angled at 20 degrees for the needle. You can use a piece of sandpaper or a belt sander for the angle but just be careful with the heat generated.

download the files on: https://www.thingiverse.com/thing:5409555


649-1
Every Thursday is #3dthursday here at Adafruit! The DIY 3D printing community has passion and dedication for making solid objects from digital models. Recently, we have noticed electronics projects integrated with 3D printed enclosures, brackets, and sculptures, so each Thursday we celebrate and highlight these bold pioneers!

Have you considered building a 3D project around an Arduino or other microcontroller? How about printing a bracket to mount your Raspberry Pi to the back of your HD monitor? And don’t forget the countless LED projects that are possible when you are modeling your projects in 3D!

LIVE CHAT IS HERE! http://adafru.it/discord

Adafruit on Instagram: https://www.instagram.com/adafruit

Shop for parts to build your own DIY projects http://adafru.it/3dprinting

3D Printing Projects Playlist:

3D Hangout Show Playlist:

Layer by Layer CAD Tutorials Playlist:

Timelapse Tuesday Playlist:

Connect with Noe and Pedro on Social Media:

Noe’s Twitter / Instagram: http://instagram.com/ecken

Pedro’s Twitter / Instagram: http://instagram.com/videopixil

Next-Level Text Prompts for Midjourney AI

If you’ve been messing around with Midjourney (like I have), you might be ready to dig a little deeper into what’s possible with this software.

In this video, Vladimir Chopine talks about getting better image results by using commas, quotes, weights, positioning, and styling prompts.

Bonus tips:

How Much Does It Cost to 3D Print Miniatures

In this Hellstorm Wargaming video, Mikey wants to know exactly how much a resin 3D printed gaming miniature costs him. The cost turns out to be under a British pound (a little over a US dollar).

But, as you might imagine, once you start adding in the cost of wasted support material, the cost of the printer, and other tools, materials, and supplies, that cost goes up by quite a bit.

But, if you have a printer set-up already, printing minis on it is surprisingly cheap.

3D Hangouts Today with @ecken @videopixil

Livestream starts Wednesday, August 31 2022 at 11:00am ET

This week @adafruit we’re making a Raspberry Pi Plex media server. Prototyping a kumiko inspired vase printed in ProtoPasta wood filament. Timelapse this week features a dice roller designed as a skull, spooky!

Learn guide
https://learn.adafruit.com/pi-ssd-media-server/

YouTube Video
https://youtu.be/2f3EQOqmhAg

Raspberry Pi 4
https://www.adafruit.com/product/4295

1.9in TFT Display
https://www.adafruit.com/product/5394

Pimoroni Nano HAT
https://www.adafruit.com/product/3577

Timelapse Tuesday

Skull Dice Tower – By Aaron Gord
https://www.thingiverse.com/thing:5471687
https://youtu.be/etmn6U_8ojk

Community Makes:

https://www.thingiverse.com/thing:5485186 Perma Proto Case
https://www.printables.com/model/7257-geodesic-lamp-shade/comments/367204
https://www.printables.com/model/7260-raspberry-pi-zero-stand/comments/366325


Tuesday, August 30, 2022

A Celebration of Anime in San Francisco #ArtTuesday

At film schools across the world, there are nights, probably early on in the school year, when cries of “AKIRA!” and TETSUO!” And on those nights, everyone who had been initiated into the cult of Akira would nod sagely. Everyone who hasn’t seen Akira would, of course, be rightfully annoyed. Akira was the crossover hit that brought the world of Japanese animated films to the United States. And on July 14th, the Spoke Art gallery in San Francisco will hold SUGO! A TRIBUTE TO JAPANESE ANIMATION. Here’s more from JUXTAPOZ:

Featuring over sixty works of art from artists around the world, this exhibition is a testament to the influence and reach that the genre has had on generations of pop culture fans far and wide. This exhibition includes paintings, sculptures, illustrations and limited edition prints; offering one-of-a- kind works of art.

With adept storytelling and iconic characters, anime has transcended into a global phenomenon from what was once a very niche community. Like many forms of animation and entertainment, anime itself has grown up alongside its fans and over the past several decades has matured and evolved into a serious art form worthy of accolades, awards and cultural and societal acknowledgment.

See more!


Screenshot 4 2 14 11 48 AMEvery Tuesday is Art Tuesday here at Adafruit! Today we celebrate artists and makers from around the world who are designing innovative and creative works using technology, science, electronics and more. You can start your own career as an artist today with Adafruit’s conductive paints, art-related electronics kits, LEDs, wearables, 3D printers and more! Make your most imaginative designs come to life with our helpful tutorials from the Adafruit Learning System. And don’t forget to check in every Art Tuesday for more artistic inspiration here on the Adafruit Blog!

Unlocking the Secrets of Vermeer #ArtTuesday

Vermeer image 1

When the National Gallery of Art closed in 2020 researchers took the opportunity to look deep, very deep, into some Vermeer’s. They used advanced techniques that let them see underlayers and potential rough brush strokes.

Senior imaging scientist John Delaney and imaging scientist Kate Dooley, internationally recognized for their groundbreaking analysis of art and artists’ techniques, use technologically advanced equipment to generate hundreds of chemical images that allow them to “see” into the paint layers and better understand the painting process. The scientists and their colleagues can then analyze the resulting data to reveal how the artist worked—how and where he applied the different and complementary colors, paint layers, and drying agents. It is something like creating a detailed chemical map of the artist’s creative technique.

See more


Screenshot 4 2 14 11 48 AMEvery Tuesday is Art Tuesday here at Adafruit! Today we celebrate artists and makers from around the world who are designing innovative and creative works using technology, science, electronics and more. You can start your own career as an artist today with Adafruit’s conductive paints, art-related electronics kits, LEDs, wearables, 3D printers and more! Make your most imaginative designs come to life with our helpful tutorials from the Adafruit Learning System. And don’t forget to check in every Art Tuesday for more artistic inspiration here on the Adafruit Blog!

Raspberry Pi Pico W + CircuitPython – BLINK :)

This firmware UF2 for the Raspberry Pi Pico W LOOKS simple enough… on boot it blinks the onboard LED 3 times and then boots into CircuitPython 8. but, looks can be deceiving! the LED on the Pico W is not connected to a GPIO on the RP2040… it’s connected to a GPIO on the WiFi/BLE module! that blinking means that we’re able to load firmware and communicate with the module in the CircuitPython firmware, an important first step before we implement the rest of the wireless stack. soon, we’ll have CircuitPython and the hundreds of libraries and IoT examples ready to run on the Pico W, we can’t wait to show you more as we get ready for folks to test it out 🙂video.

Sunday, August 28, 2022

Receiving Weather Satellites on a Raspberry Pi or Linux

This NOAA Weather satellite setup on a Raspberry PI 4 using Raspberry OS either 32 or 64 bit was shared by TekMaker on Youtube!

I do the step by step setup for the Raspberry PI OS 32 bit version, but it should equally work for the 64 bit version as I have done it previously. All you need is an SDR, aerial and a Raspberry PI 4 with Raspberry PI OS installed and about an hour to do it.

I show you how to install rtl-sdr drivers, GQRX, GPredict and WxToImg and set up automated recordings.

These instructions will work for any Debian/Ubuntu distro too including 64 bit

Check out more in depth details on TekMakers blog!


3055 06Each Friday is PiDay here at Adafruit! Be sure to check out our posts, tutorials and new Raspberry Pi related products. Adafruit has the largest and best selection of Raspberry Pi accessories and all the code & tutorials to get you up and running in no time!

Saturday, August 27, 2022

3D Printing a Cool, Custom Monitor Stand

In this Proper Printing video, Jon decides to add a second monitor to his work desk and figures that it’s a good excuse to create something far more interesting than the usual, boring monitor stand.

He designs and 3D prints a stand that has lights and ports for USB, Ethernet, and HDMI. It is kind of bizarre when you think about it that more stands do not have these features built into them.

Friday, August 26, 2022

A small CNC drawing machine #piday #raspberrypi @Raspberry_Pi

A4j2pucuaah91

Clever use of some old electronics from u/pheux9558 on Reddit. They fashioned this drawing machine!

I‘m using old CD drives for the X and Y-Axis, an old Floppy Drive for the Z-Axis and a servo motor to move the pen. I wrote the whole software by myself. On the Arduino is a G-Code interpreter to control the movement via coordinates. On the Raspberry runs a Python software to manage the upload of the G-Code per Serial. The GUI is currently in development. On the Arduino Uno is a prototype software of an GPIO extender I wrote, to program, read and write Arduino pins with a Python script. It took me 4 months to do it. Leave your thoughts in the comments

You can check out the thread here and follow this project (and others) on their instagram!


Learn more about different motor options for your next project

Adafruit Motor Selection Guide

Components IMG 4846


3055 06Each Friday is PiDay here at Adafruit! Be sure to check out our posts, tutorials and new Raspberry Pi related products. Adafruit has the largest and best selection of Raspberry Pi accessories and all the code & tutorials to get you up and running in no time!

Macintosh Classic II with E-Ink Display @Raspberry_Pi #PiDay #RaspberryPi

Do you have a Macintosh Classic II sitting around somewhere? Do you need something to do with your Raspberry Pi? Do you want an e-ink screen that can display photos on that old Apple? Here’s a project just for you. Here’s more from hackaday:

The Macintosh Classic II was the successor to the first Macintosh computer Apple sold that had a price tag under $1000. As such, there were some lower specs for this machine such as the monochrome 512×342 display. This one has been retrofitted with an e-ink display which actually gives it some of the same grayscale aesthetic as the original. The e-ink display is driven by a Raspberry Pi which displays a replica System 7 environment and a set of photos.

See more!


3055 06Each Friday is PiDay here at Adafruit! Be sure to check out our posts, tutorials and new Raspberry Pi related products. Adafruit has the largest and best selection of Raspberry Pi accessories and all the code & tutorials to get you up and running in no time!

Halloween Laser Tripwire #piday #raspberrypi @Raspberry_Pi

Halloween is quickly approaching and kestrel151 shared some of their prep on reddit. They’ve set up a laser tripwire that triggers a sp00ky sound when broken! Check out the video demo here


3055 06Each Friday is PiDay here at Adafruit! Be sure to check out our posts, tutorials and new Raspberry Pi related products. Adafruit has the largest and best selection of Raspberry Pi accessories and all the code & tutorials to get you up and running in no time!

Gesture recognition on pico using Edge Impulse @Raspberry_Pi #PiDay #RaspberryPi

Sketch GjXHL6iKWc

Neat project + write-up from Shubham Santosh up on Hackster.io!

Embedded machine learning has now become easy with the help of online platforms like Edge Impulse and allows creators to devise their own application with just a little or no knowledge on Machine learning.

In this project I have created a basic gesture recognition device using an MPU6050 accelerometer sensor and a pi pico. The model is trained to recognize left-right, up-down and idle motion and can be enhanced further by adding more gestures to it. The gesture recognized is displayed on an 128*64 SSD1306 OLED display and even from the serial monitor(optional).


3055 06Each Friday is PiDay here at Adafruit! Be sure to check out our posts, tutorials and new Raspberry Pi related products. Adafruit has the largest and best selection of Raspberry Pi accessories and all the code & tutorials to get you up and running in no time!

Thursday, August 25, 2022

Jointing Jig for Cardboard #3DThursday

SergBDB shared on Thingiverse:

holder for gluing cardboard 2 mm


649-1
Every Thursday is #3dthursday here at Adafruit! The DIY 3D printing community has passion and dedication for making solid objects from digital models. Recently, we have noticed electronics projects integrated with 3D printed enclosures, brackets, and sculptures, so each Thursday we celebrate and highlight these bold pioneers!

Have you considered building a 3D project around an Arduino or other microcontroller? How about printing a bracket to mount your Raspberry Pi to the back of your HD monitor? And don’t forget the countless LED projects that are possible when you are modeling your projects in 3D!

The Adafruit Learning System has dozens of great tools to get you well on your way to creating incredible works of engineering, interactive art, and design with your 3D printer! If you’ve made a cool project that combines 3D printing and electronics, be sure to let us know, and we’ll feature it here!

Piunora Hawk Box #3DThursday

badabby shared on Thingiverse:

Piunora Hawk Box

box for the piunora that you can attach the pi hawk camera from arducam to. only fits this heat sink: https://ift.tt/iE8gyGD or smaller. doesn’t work with the heat sink that was initially sold in the piunora kickstarter.


649-1
Every Thursday is #3dthursday here at Adafruit! The DIY 3D printing community has passion and dedication for making solid objects from digital models. Recently, we have noticed electronics projects integrated with 3D printed enclosures, brackets, and sculptures, so each Thursday we celebrate and highlight these bold pioneers!

Have you considered building a 3D project around an Arduino or other microcontroller? How about printing a bracket to mount your Raspberry Pi to the back of your HD monitor? And don’t forget the countless LED projects that are possible when you are modeling your projects in 3D!

The Adafruit Learning System has dozens of great tools to get you well on your way to creating incredible works of engineering, interactive art, and design with your 3D printer! If you’ve made a cool project that combines 3D printing and electronics, be sure to let us know, and we’ll feature it here!

Chain Chomp Inspired Wall Hanger #3DThursday

https://www.thingiverse.com/0mni42 shared on Thingiverse:

Chain Chomp Wall Hanging

Wall hanging shaped like a Chain Chomp.


649-1
Every Thursday is #3dthursday here at Adafruit! The DIY 3D printing community has passion and dedication for making solid objects from digital models. Recently, we have noticed electronics projects integrated with 3D printed enclosures, brackets, and sculptures, so each Thursday we celebrate and highlight these bold pioneers!

Have you considered building a 3D project around an Arduino or other microcontroller? How about printing a bracket to mount your Raspberry Pi to the back of your HD monitor? And don’t forget the countless LED projects that are possible when you are modeling your projects in 3D!

The Adafruit Learning System has dozens of great tools to get you well on your way to creating incredible works of engineering, interactive art, and design with your 3D printer! If you’ve made a cool project that combines 3D printing and electronics, be sure to let us know, and we’ll feature it here!

Wednesday, August 24, 2022

Ninjago Inspired Shuriken #3DThursday

Allenkia15 shared on Thingiverse:

Lego Ninjago Shurikens of Ice

These Shurikens of Ice are the perfect size for a kid to feel like they’re Zane the Ice Ninja from Ninjago.

Print shurikens_of_ice.stl and insert pegs into square holes to fit the two halves together. It should be a snug fit. Glue or don’t. I didn’t need to.

If your buildplate is too small, print left_half.stl and right_half.stl separately and print 9 of peg.stl


649-1
Every Thursday is #3dthursday here at Adafruit! The DIY 3D printing community has passion and dedication for making solid objects from digital models. Recently, we have noticed electronics projects integrated with 3D printed enclosures, brackets, and sculptures, so each Thursday we celebrate and highlight these bold pioneers!

Have you considered building a 3D project around an Arduino or other microcontroller? How about printing a bracket to mount your Raspberry Pi to the back of your HD monitor? And don’t forget the countless LED projects that are possible when you are modeling your projects in 3D!

The Adafruit Learning System has dozens of great tools to get you well on your way to creating incredible works of engineering, interactive art, and design with your 3D printer! If you’ve made a cool project that combines 3D printing and electronics, be sure to let us know, and we’ll feature it here!

Auxetic Wear – A shoe that adapts to the foot #WearableWednesday #3DPrinting

Werteloberfell Auxetic Shoe 01

This 3d printed shoe will form itself to the wearer. Auxetics are:

Auxetics are structures or materials that have a negative Poisson’s ratio. When stretched, they become thicker perpendicular to the applied force. This occurs due to their particular internal structure and the way this deforms when the sample is uniaxially loaded.

Stylish concept chelsea boot from WertelOBerfell. If you check out the project page they show a bunch of the process and prototypes, which is always fun!

A shoe that adapts to the foot – not the other way around. A reinterpretation of a classic design.
By utilizing an auxetic structure, the boot adapts itself to the ergonomics of its wearers’ feet by expanding or compressing on a local level.

Learning from classic shoemaker craft, we created a pattern comprising of two-dimensional shapes that are very effective for 3D printing due to their low profile.


Upgrade your own footwear with the classic Adafruit project Gemma Firewalker Lite Sneakers


Flora breadboard is Every Wednesday is Wearable Wednesday here at Adafruit! We’re bringing you the blinkiest, most fashionable, innovative, and useful wearables from around the web and in our own original projects featuring our wearable Arduino-compatible platform, FLORA. Be sure to post up your wearables projects in the forums or send us a link and you might be featured here on Wearable Wednesday!

3D Hangouts Today with @videopixil @ecken

Livestream starts Wednesday August 24 at 11am ET

This week @adafruit we’re looking at the new and improved Wipper Snapper for making an IoT climate controlled room with a smart outlet and QT Py ESP32 S2. Update to our Raspberry Pi Plex media server prototype. Timelapse this week features a creepy skull with teeth for eyes printed in glow-in-the-dark filament, terrifying!

Wipper Snapper Video on YouTube
https://youtu.be/_VC2RdSWZc8

Wipper Snapper Quick Start
https://learn.adafruit.com/quickstart-adafruit-io-wippersnapper

QT Py ESP32 S2
https://www.adafruit.com/product/5325

AHT20 Sensor
https://www.adafruit.com/product/4566

Outlet Power Relay
https://www.adafruit.com/product/2935

Timelapse Tuesday

Skull of the Corinthian by Sator
https://cults3d.com/en/3d-model/art/el-corintio
https://youtu.be/2WiYzLzWQ50

Community Makes:

https://www.printables.com/model/7285-hand-crank-solder-dispenser/comments#makes


Tuesday, August 23, 2022

The impossible geometry of video artist Matt Taylor #ArtTuesday


View this post on Instagram


A post shared by Matt Taylor (@emty01)

Matt Taylor has based part of his work on the exploration of impossible spaces and objects. To compose his pieces, Taylor makes use of mathematics, geometry and optical art.To compose his pieces, Taylor makes use of mathematics, geometry and optical art. Learn more and follow Matt on Instagram


Screenshot 4 2 14 11 48 AMEvery Tuesday is Art Tuesday here at Adafruit! Today we celebrate artists and makers from around the world who are designing innovative and creative works using technology, science, electronics and more. You can start your own career as an artist today with Adafruit’s conductive paints, art-related electronics kits, LEDs, wearables, 3D printers and more! Make your most imaginative designs come to life with our helpful tutorials from the Adafruit Learning System. And don’t forget to check in every Art Tuesday for more artistic inspiration here on the Adafruit Blog!

Monday, August 22, 2022

UPDATED GUIDE: Setting up a Raspberry Pi as a WiFi Access Point

UPDATED: Setting up a Raspberry Pi as a WiFi Access Point

Turn a spare Raspberry Pi into a WiFi router/hotspot. Among our earliest Pi tutorials (check out that vintage Pi Model B!), this guide’s been overhauled to support the current Raspberry Pi OS across all models…new, old and everything in-between, whether using built-in WiFi (Pi 3B+ onwards) or a WiFi USB adapter.

Read more…

Sunday, August 21, 2022

First Look At Guillermo Del Toro’s Cabinet of Curiosities

As a member of a rather shameless and vocal sector of the population, I’m either looking forward to October, enjoying October, or sad October is over. This new trailer from Netflix of Guillermo Del Toro’s upcoming series Cabinet of Curiosities has definitely upped my annual autumnal anticipation level.

Guillermo Del Toro – The master of horror – gives a First Look at some of the twisted nightmares and violent delights from his new anthology series.

Guillermo Del Toro’s Cabinet of Curiosities is a collection of sinister stories, told by some of today’s most revered horror creators – including the directors of The Babadook, Splice, Mandy, and many more.

Friday, August 19, 2022

Raspberry Pi Zero 2W to Pi 4B adapter

leepspvideo shared this video on Youtube! Check out their channel for raspberry pi news and more!


3055 06Each Friday is PiDay here at Adafruit! Be sure to check out our posts, tutorials and new Raspberry Pi related products. Adafruit has the largest and best selection of Raspberry Pi accessories and all the code & tutorials to get you up and running in no time!

Tip for Improving Cardboard Spool Behavior on Prusa i3 Mk3

Cardboard filament spools are great for the environment. But the way the spool holder on the Prusa i3 Mk3 is designed, it can rub the cardboard and create unwanted dust.

To alleviate this problem, Spencer of Kinetic Precision NH came up with a simply fix. He made 3D printed adapter sleeves that go over the existing spool holders. Problem solved.

Chasing Your Tail #piday #raspberrypi @Raspberry_Pi

Chasing Your Tail is Matt Edmondson’s code that helps to determine if you’re being followed with nearby wireless signals. Edmondson presented the project at Black Hat USA 2022, presentation slides here. WIRED has a great article thoroughly discussing Matt Edmondson’s work and tracking tools in general.

Get the code on GitHub.


3055 06Each Friday is PiDay here at Adafruit! Be sure to check out our posts, tutorials and new Raspberry Pi related products. Adafruit has the largest and best selection of Raspberry Pi accessories and all the code & tutorials to get you up and running in no time!

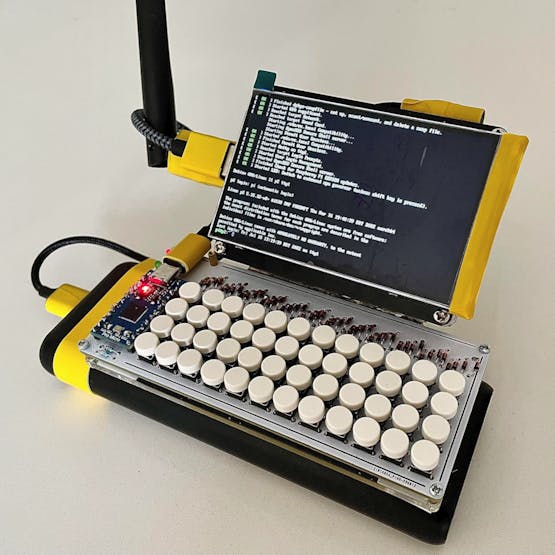
Open Source Intelligence Cyberdeck packs a Raspberry Pi #PiDay @Raspberry_Pi @hacksterio

Maker and analyst Jordan Wildon has put together a stylish cyberdeck designed for open source intelligence (OSINT) work — and built around a Raspberry Pi 4 Model B 4GB single-board computer.

“I’m an (amateur) developer and full-time OSINT analyst,” Wildon explains of the project’s scope. “My job mostly surrounds designing methods to collect and analyze information. This’ll most likely be my playground for new tools and investigating shady internet goings on. Right now I’m running Raspbian Lite but intend to swap it out after playing a bit more.”

The heart of the system, designed for a compact layout, is a Raspberry Pi 4 Model B 4GB single-board computer linked to a Pimoroni HyperPixel 4.0 display. The unusually small keyboard is a PocketType, built around tactile switches and with small round keycaps in order to reduce the overall footprint.

You can read more on the builder’s Reddit thread and an article on hackster.io.
This compact cyberdeck is designed for command-line open source intelligence (OSINT) work. (📷: Jordan Wildon)

A web dashboard for the Enviro Plus Raspberry Pi HAT #PiDay @Raspberry_Pi @EddieSneed66

Ed writes in to Adafruit:

Over the past month or so, I decided to get back to working on a contribution project for the Pimoroni Enviro Plus Raspberry Pi HAT. I had already made a pull request over a year ago for a simple command line application for sending sensor data to an Adafruit IO dashboard, and thought it was about time to contribute something that was a step up from a lot of other examples I regularly see.

I decided to create a ReactJS web UI utilizing a Python (Flask) based backend for easy communication with the HAT. The project offers both new and experienced users a change of pace and template for more complex dashboard-like projects where multiple language components can be use to create something really awesome for such a tiny power-house! The ‘screenshots’ folder of the repo has a nice little image of the dashboard running on a Pi, and I’ll be adding a supplement image of the backside of the enclosure tonight.

I think it would be a great inspiration for future projects!

The code is MIT Licensed and is all available with a guide on GitLab.

IoT Security Camera With Raspberry Pi, Render and Pi Camera2 @Raspberry_Pi #PiDay #RaspberryPi

CCJ5H7Z7H0 blob

Neat project and write-up from Luca Cipriani up on Hackster.io

We’ll create a smart camera control system to secure any room in your house in a few steps:

The system takes a picture every time a motion is detected, for which we’ll use a motion detection module.

Read more


3055 06Each Friday is PiDay here at Adafruit! Be sure to check out our posts, tutorials and new Raspberry Pi related products. Adafruit has the largest and best selection of Raspberry Pi accessories and all the code & tutorials to get you up and running in no time!

Thursday, August 18, 2022

FDM-Printable Microscope Objective RMS Thread #3DThursday #3DPrinting

Thinger13 shares:

The enclosed Microscope_RMS_thread_ring.stl file is meant as examples for your testing and is assuming a layer height of 0.3 mm. You may adapt the layer height and other parameters (e.g. vertical allowance) in the OpenSCAD source file.

The enclosed Microscope_RMS_thread.stl file (also assuming 0.3 mm layer height) may be integrated into your CAD design if you are using a CAD tool other than OpenSCAD.

See also my other designs:
https://www.thingiverse.com/thinger13/designs

download the files on: https://www.thingiverse.com/thing:5400281


649-1
Every Thursday is #3dthursday here at Adafruit! The DIY 3D printing community has passion and dedication for making solid objects from digital models. Recently, we have noticed electronics projects integrated with 3D printed enclosures, brackets, and sculptures, so each Thursday we celebrate and highlight these bold pioneers!

Have you considered building a 3D project around an Arduino or other microcontroller? How about printing a bracket to mount your Raspberry Pi to the back of your HD monitor? And don’t forget the countless LED projects that are possible when you are modeling your projects in 3D!

LIVE CHAT IS HERE! http://adafru.it/discord

Adafruit on Instagram: https://www.instagram.com/adafruit

Shop for parts to build your own DIY projects http://adafru.it/3dprinting

3D Printing Projects Playlist:

3D Hangout Show Playlist:

Layer by Layer CAD Tutorials Playlist:

Timelapse Tuesday Playlist:

Connect with Noe and Pedro on Social Media:

Noe’s Twitter / Instagram: http://instagram.com/ecken

Pedro’s Twitter / Instagram: http://instagram.com/videopixil

Apple USBC Cable Organizer #3DThursday #3DPrinting

DRUPF shares:

I was looking online for something to organize my 2-meter USB-C cable. The only one I found was the Fusereel Sidekick, which was not available in Canada and looked like it only worked for a 1-meter cable. So I decided to design one that could comfortably fit a 2m cable on my 30Watt power adapter.

This is a handy tool if you want to stay organized and don’t want a 2-meter-long cable taking up space when an outlet is right beside you.

I printed mine using PLA; however, you could print this using flexible filament to be less rigid.

You can also scale this up to fit a larger MacBook power adapter

download the files on: https://www.thingiverse.com/thing:5399926


649-1
Every Thursday is #3dthursday here at Adafruit! The DIY 3D printing community has passion and dedication for making solid objects from digital models. Recently, we have noticed electronics projects integrated with 3D printed enclosures, brackets, and sculptures, so each Thursday we celebrate and highlight these bold pioneers!

Have you considered building a 3D project around an Arduino or other microcontroller? How about printing a bracket to mount your Raspberry Pi to the back of your HD monitor? And don’t forget the countless LED projects that are possible when you are modeling your projects in 3D!

LIVE CHAT IS HERE! http://adafru.it/discord

Adafruit on Instagram: https://www.instagram.com/adafruit

Shop for parts to build your own DIY projects http://adafru.it/3dprinting

3D Printing Projects Playlist:

3D Hangout Show Playlist:

Layer by Layer CAD Tutorials Playlist:

Timelapse Tuesday Playlist:

Connect with Noe and Pedro on Social Media:

Noe’s Twitter / Instagram: http://instagram.com/ecken

Pedro’s Twitter / Instagram: http://instagram.com/videopixil

Mouse Bot USB Holder #3DThursday #3DPrinting

Props3DPro shares:

Combo USB Holder for SD cards, USB Sticks, and Micro SD cards. Makes an awesome desk display and practical to boot!

download the files on: https://www.thingiverse.com/thing:5377105


649-1
Every Thursday is #3dthursday here at Adafruit! The DIY 3D printing community has passion and dedication for making solid objects from digital models. Recently, we have noticed electronics projects integrated with 3D printed enclosures, brackets, and sculptures, so each Thursday we celebrate and highlight these bold pioneers!

Have you considered building a 3D project around an Arduino or other microcontroller? How about printing a bracket to mount your Raspberry Pi to the back of your HD monitor? And don’t forget the countless LED projects that are possible when you are modeling your projects in 3D!

LIVE CHAT IS HERE! http://adafru.it/discord

Adafruit on Instagram: https://www.instagram.com/adafruit

Shop for parts to build your own DIY projects http://adafru.it/3dprinting

3D Printing Projects Playlist:

3D Hangout Show Playlist:

Layer by Layer CAD Tutorials Playlist:

Timelapse Tuesday Playlist:

Connect with Noe and Pedro on Social Media:

Noe’s Twitter / Instagram: http://instagram.com/ecken

Pedro’s Twitter / Instagram: http://instagram.com/videopixil

Stackable Brick Box #3DThursday #3DPrinting

Llockart shares:

I was tired of small parts lying around, so I designed this box to store my son’s bricks. As his collection is still in its infancy and is likely to grow, you might as well take inspiration from the brick system to allow all the boxes to be stacked in the future!

The box is made up of 3 pieces that fit together without glue. The proportions are those of the official system.

You can recover and modify the source file on Tinkercad, for example to imagine other bricks of other dimensions and share them again! I could link them on this page !
https://www.tinkercad.com/things/b4iPDxf5SjQ

download the files on: https://www.thingiverse.com/thing:5385419


649-1
Every Thursday is #3dthursday here at Adafruit! The DIY 3D printing community has passion and dedication for making solid objects from digital models. Recently, we have noticed electronics projects integrated with 3D printed enclosures, brackets, and sculptures, so each Thursday we celebrate and highlight these bold pioneers!

Have you considered building a 3D project around an Arduino or other microcontroller? How about printing a bracket to mount your Raspberry Pi to the back of your HD monitor? And don’t forget the countless LED projects that are possible when you are modeling your projects in 3D!

LIVE CHAT IS HERE! http://adafru.it/discord

Adafruit on Instagram: https://www.instagram.com/adafruit

Shop for parts to build your own DIY projects http://adafru.it/3dprinting

3D Printing Projects Playlist:

3D Hangout Show Playlist:

Layer by Layer CAD Tutorials Playlist:

Timelapse Tuesday Playlist:

Connect with Noe and Pedro on Social Media:

Noe’s Twitter / Instagram: http://instagram.com/ecken

Pedro’s Twitter / Instagram: http://instagram.com/videopixil

Pokemon Victreebel pencil holder #3DThursday #3DPrinting

dusdlgh shares:

I don’t know how to color, so I designed it so that I could print it in each color and assemble it.
And I want my designs to be practical, not just ornamental. So I made it used for pencil holder on my desk.

download the files on: https://www.thingiverse.com/thing:5374817


649-1
Every Thursday is #3dthursday here at Adafruit! The DIY 3D printing community has passion and dedication for making solid objects from digital models. Recently, we have noticed electronics projects integrated with 3D printed enclosures, brackets, and sculptures, so each Thursday we celebrate and highlight these bold pioneers!

Have you considered building a 3D project around an Arduino or other microcontroller? How about printing a bracket to mount your Raspberry Pi to the back of your HD monitor? And don’t forget the countless LED projects that are possible when you are modeling your projects in 3D!

LIVE CHAT IS HERE! http://adafru.it/discord

Adafruit on Instagram: https://www.instagram.com/adafruit

Shop for parts to build your own DIY projects http://adafru.it/3dprinting

3D Printing Projects Playlist:

3D Hangout Show Playlist:

Layer by Layer CAD Tutorials Playlist:

Timelapse Tuesday Playlist:

Connect with Noe and Pedro on Social Media:

Noe’s Twitter / Instagram: http://instagram.com/ecken

Pedro’s Twitter / Instagram: http://instagram.com/videopixil

Small fold out wall shelf #3DThursday #3DPrinting

Nick3dmaster shares:

This is a simple, small shelf that flips up flat onto the wall. It is useful for a small space or an office. (In my case I use it in a camper bunk). The shelf is 10×10 cm, perfect for a phone to lay on or maybe a pair of sunglasses.

The key lock is not needed due to the shelf’s stiffness, but there in case it comes a bit loose.

Let me know if anything needs adjusted; I made some changes since I printed the first prototype

download the files on: https://www.thingiverse.com/thing:5380664


649-1
Every Thursday is #3dthursday here at Adafruit! The DIY 3D printing community has passion and dedication for making solid objects from digital models. Recently, we have noticed electronics projects integrated with 3D printed enclosures, brackets, and sculptures, so each Thursday we celebrate and highlight these bold pioneers!

Have you considered building a 3D project around an Arduino or other microcontroller? How about printing a bracket to mount your Raspberry Pi to the back of your HD monitor? And don’t forget the countless LED projects that are possible when you are modeling your projects in 3D!

LIVE CHAT IS HERE! http://adafru.it/discord

Adafruit on Instagram: https://www.instagram.com/adafruit

Shop for parts to build your own DIY projects http://adafru.it/3dprinting

3D Printing Projects Playlist:

3D Hangout Show Playlist:

Layer by Layer CAD Tutorials Playlist:

Timelapse Tuesday Playlist:

Connect with Noe and Pedro on Social Media:

Noe’s Twitter / Instagram: http://instagram.com/ecken

Pedro’s Twitter / Instagram: http://instagram.com/videopixil

Pill Dispenser #3DThursday #3DPrinting

prometheus89 shares:

Dispense a single pill into your hand with the push of a button rather than unscrewing the lid each time. The three components are each individually printed and assembled using two small screws. The push button operates with a spring harvested from any standard writing pen. The pill bottle is pressure fitted onto the pill hopper. Screw threads were omitted to provide versatility between different bottles. However, I fully support anyone modifying the design to include a threaded orifice. This design works best with smaller oblong or oval shaped pills with a hard outer coating such as those used for allergy medications. I’ve found that round pills with a matted surface such as standard Ibuprofen don’t slide around each other easily and tend to clog the bottom mechanism. If a pill doesn’t dispense after two pushes, a simple tap on the side of the bottle allows compacted pills to loosen and drop to the bottom.

download the files on: https://www.thingiverse.com/thing:5382973


649-1
Every Thursday is #3dthursday here at Adafruit! The DIY 3D printing community has passion and dedication for making solid objects from digital models. Recently, we have noticed electronics projects integrated with 3D printed enclosures, brackets, and sculptures, so each Thursday we celebrate and highlight these bold pioneers!

Have you considered building a 3D project around an Arduino or other microcontroller? How about printing a bracket to mount your Raspberry Pi to the back of your HD monitor? And don’t forget the countless LED projects that are possible when you are modeling your projects in 3D!

LIVE CHAT IS HERE! http://adafru.it/discord

Adafruit on Instagram: https://www.instagram.com/adafruit

Shop for parts to build your own DIY projects http://adafru.it/3dprinting

3D Printing Projects Playlist:

3D Hangout Show Playlist:

Layer by Layer CAD Tutorials Playlist:

Timelapse Tuesday Playlist:

Connect with Noe and Pedro on Social Media:

Noe’s Twitter / Instagram: http://instagram.com/ecken

Pedro’s Twitter / Instagram: http://instagram.com/videopixil