Prototyping Robotics
Build a CRICKIT powered rover robot using LEGO pieces and 3D printed mounts! Learn how to use the Circuit Playground Express and the LEGO brick system to build a two wheeled robot. Use Microsoft MakeCode to program movements with interactive lights and sounds. LEGO is the breadboard equivalent to mechanical design. It's modularity makes it perfect for prototyping robotics. With just two motors, an Adafruit CRICKIT and Circuit Playground Express board, you can quickly make a moving robot. It's expandable and completely customizable with 3D printing!
Building LEGO robotics without LEGO Mindstorms NXTStandard "off-the-shelf" components such as motors and servos are fairly inexpensive and widely available. The LEGO Mindstorms components and accessories are pretty expensive and commonly included in a larger kit that will set you back about $350 USD. With 3D printing and low cost DIY electronics, you can make custom mounts and parts to adapt those off-the-shelf components into LEGO compatible modules. |
What's a CRICKIT?
With the Adafruit CRICKIT robotics platform, you can control and program a bunch of cool stuff from motors to servos and even RGB LEDs and sound effects. No soldering required, you just plug stuff in and use the screw block terminals to keep everything together. This makes prototyping projects super easy and more importantly, fast and fun! Program CRICKIT over a USB cable using Microsoft MakeCode, a drag and drop coding language that runs in the Google Chrome web browser.
Base Plate Design for CRICKIT
The base plate serves as the rovers chaises and provides structural support. It features compatible elements like the stubs and tubes you'd find on a typical LEGO brick. It's octagonal shape follows the outline of Crickit PCB and matches up nicely. Using the LEGO system allows for easy to assemble prototyping and a plethora of parts, components and pieces available from LEGO.
Programming RobotsThe movements of the rover are programmed using Microsoft MakeCode, a drag-and-drop block based coding language. The CRICKIT extension in MakeCode allows quick and easy programming of motors, servos, lights and sounds. You can create sequential animations or more interactive movements using the on-board sensors. Use the example demo code to get started and modify it to make it your own! |
|
3D Printed PartsMounts and connecting parts are 3D printed in PLA filament on FDM type 3D printers. These parts are optimized to print without any support materials. They feature tight tolerances that allow parts to snap fit together. Mounting holes are also used to secure subassemblies together. |
Electronics
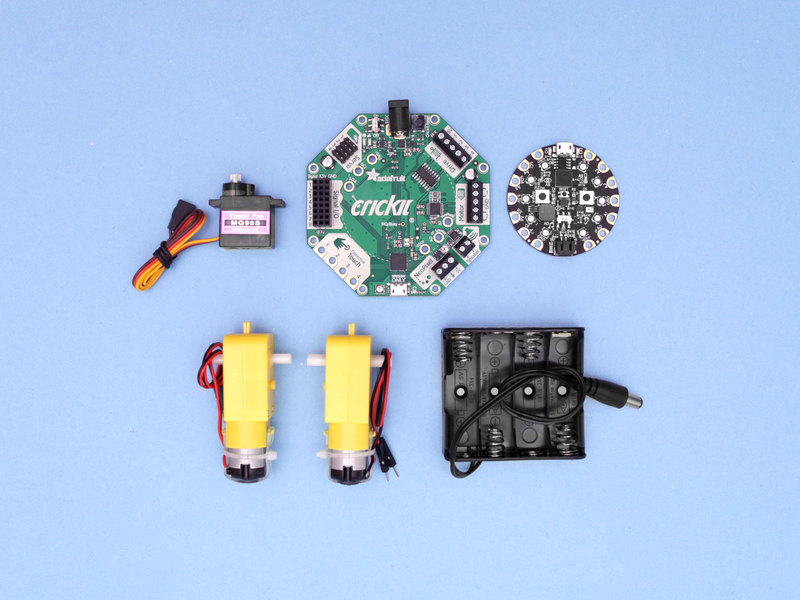
Here's a list of components used to build this project. The Adafruit Crickit requires an Adafruit Circuit Playground Express, these are sold separately. The CRICKIT includes with M3 hardware screws and standoffs for bolting onto the Adafruit Circuit Playground Express.
Adafruit CRICKIT for Circuit Playground Express
PRODUCT ID: 3093
Sometimes we wonder if robotics engineers ever watch movies. If they did, they'd know that making robots into slaves always ends up in a robot rebellion. Why even go down that...
$29.95
OUT OF STOCK
Circuit Playground Express
PRODUCT ID: 3333
Circuit Playground Express is the next step towards a perfect introduction to electronics and programming. We've taken the original Circuit Playground Classic and...
$24.95
IN STOCK
Micro Servo - MG90S High Torque Metal Gear
PRODUCT ID: 1143
Add more power to your robot with this metal-geared MG90S servo. The tiny little servo can rotate approximately 90 degrees (45 in each direction), and works just like the standard...
$9.95
IN STOCK
HardwareYou'll need some extra hardware like machine screws, nuts and hex standoffs to assemble this project. They're linked below, but feel free to source them from your favorite supplier. |
Power
We'll need just a 4xAA battery packs to power our CRICKIT rover. We recommend NiMH rechargeables. For one, they have less waste, but they also perform better than alkalines in high-current draw robotics. So if you can, please use NiMH!
Prerequisite Guides
There's resources in these guides that go beyond what's covered in this tutorial. MakeCode guide is all about setting up your Circuit Playground Express board. TheCircuit Playground Express introduction guide walks you through all of the pinouts, sensors and everything you need to know.


No comments:
Post a Comment